TikTokShop - Buy and Sell TikTok Coin Business Full Solution
TikTokShop offers a complete business solution for buying and selling TikTok Coins, allowing users to seamlessly engage in transactions and withdraw their funds. With its advanced features and secure infrastructure, TikTokShop revolutionizes the way you operate in the TikTok Coin market, providing you with a powerful platform to maximize your earning potential.
Secure Authentication:
TikTokShop prioritizes the security of your account and transactions. With robust authentication measures in place, you can trust that your information and funds are protected, giving you peace of mind while conducting your business.
User Wallet:
Manage your funds conveniently with the user wallet feature. Keep track of your TikTok Coin balance, view transaction history, and monitor your earnings all in one place. TikTokShop ensures a seamless and user-friendly experience for buyers and sellers.
Money Deposit:
Effortlessly deposit funds into your account using a range of supported payment methods. TikTokShop supports various payment options, including credit/debit cards, bank transfers, and popular digital wallets, allowing you to conveniently add funds to your wallet.
Withdraw Money:
When it's time to cash out your earnings, TikTokShop provides a smooth withdrawal process. Simply initiate a withdrawal request, and your funds will be transferred to your designated account securely and efficiently.
Sell Coin:
Maximize your earnings by selling TikTok Coins on the platform. TikTokShop enables you to list your coins for sale and reach potential buyers, expanding your customer base and increasing your revenue opportunities.
Buy Coin:
If you're looking to purchase TikTok Coins, TikTokShop has you covered. Discover a wide range of available coins for sale, select the desired quantity, and complete your purchase seamlessly. Enhance your TikTok experience and engagement with a quick and secure buying process.
Advanced Security System:
TikTokShop employs cutting-edge security measures to safeguard your transactions and protect your sensitive information. Rest assured that your data is encrypted and your transactions are secure.
Realtime Statement:
Stay informed about your financial activities with the real-time statement feature. Access detailed reports of your transactions, track your earnings, and maintain a clear overview of your TikTok Coin business.
TikTokShop provides a comprehensive full solution encompassing a mobile app (available on Android and iOS), a user-friendly website, and an intuitive admin panel. With its robust features, secure infrastructure, and commitment to user satisfaction, TikTokShop empowers you to excel in the TikTok Coin market. Join TikTokShop today and unlock your business's full potential.
Server Requirements
- PHP 8.0
- Laravel 9.1
- MySQL 5.1
- Terminal
- Composer
- Extensions : Ctype PHP, JSON, Mbstring, OpenSSL, PDO, Tokenizer, XML, Zip, Fileinfo, Gd, sodium Extension
- Mod_rewrite Apache
- BCMath PHP extension
Setup Server
install-on-server:
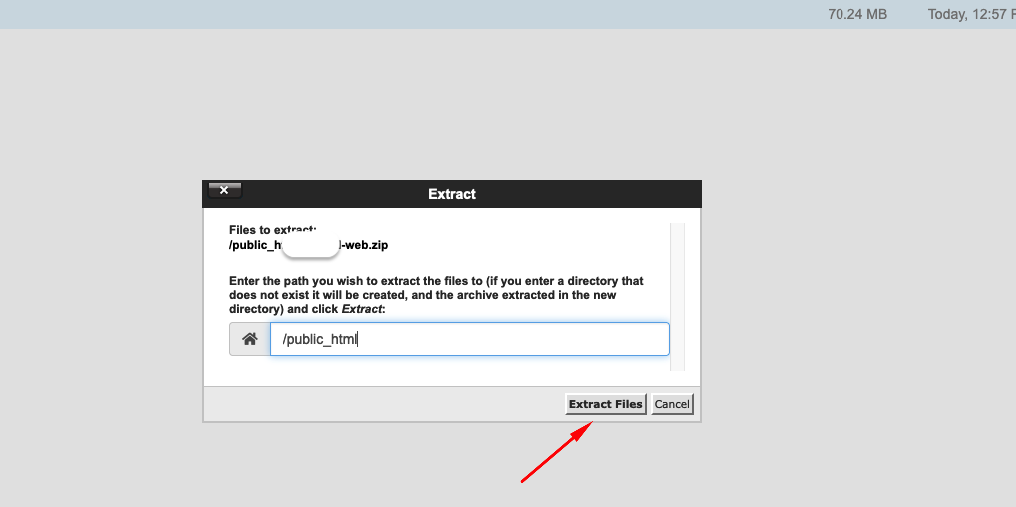
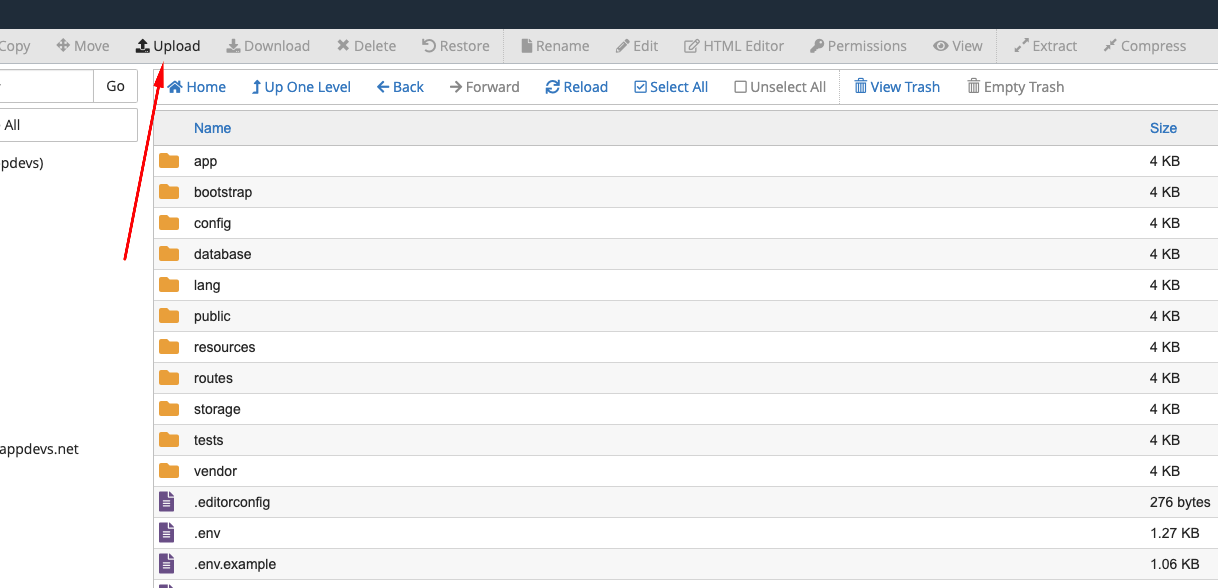
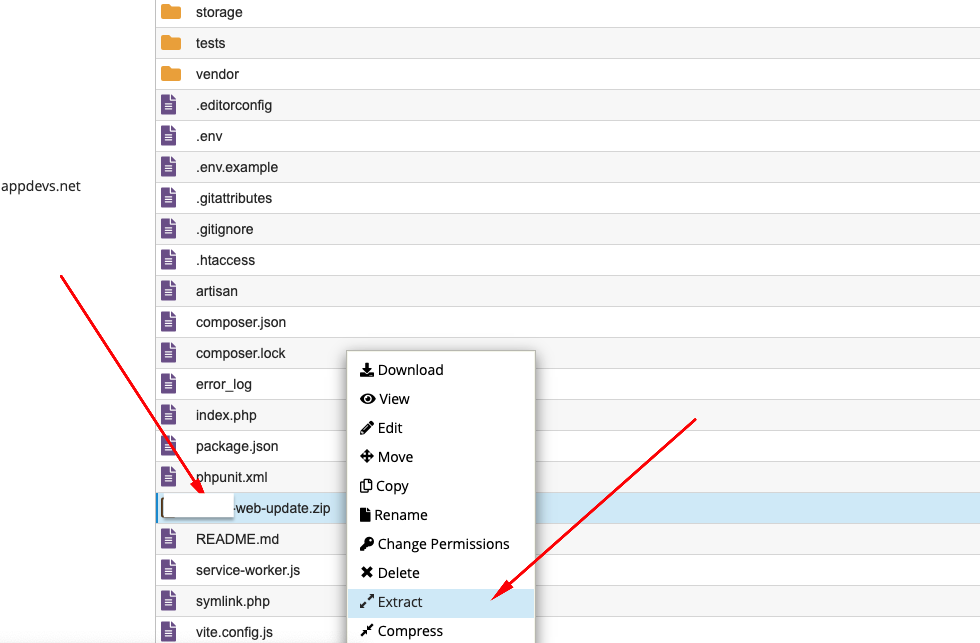
After download the code from codecayon upload the and TikTokShop-web files in your server following your expected directory and extract the zip file. It's website and admin panel can be installed on a domain or subdomain: For Example, yourdomain.com OR xyz.yourdomain.com.
Website & Admin Panel Installation:
- Step 1:
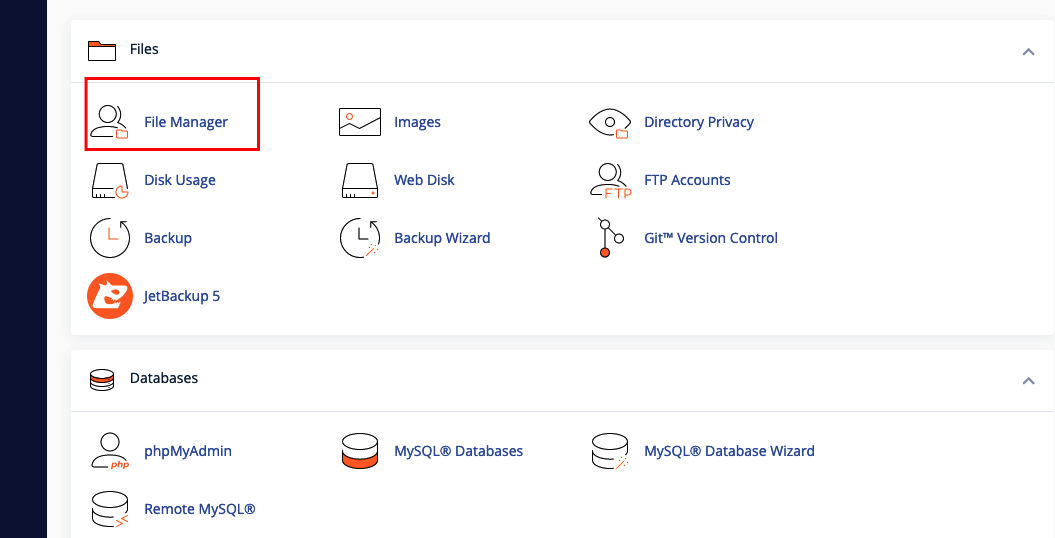
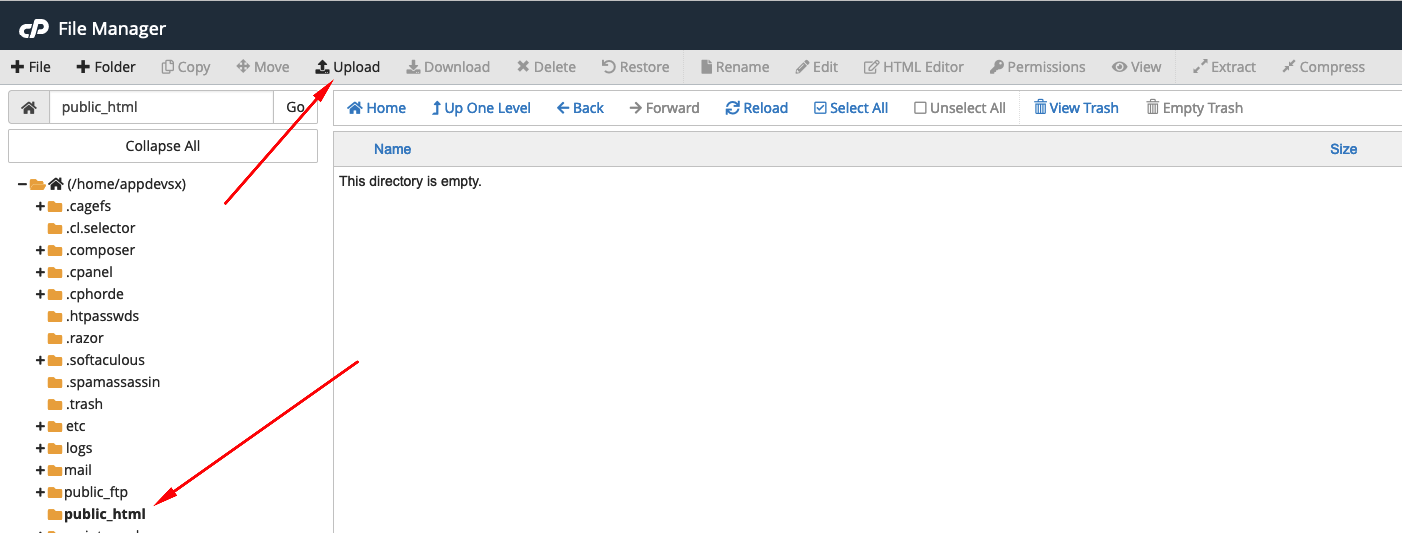
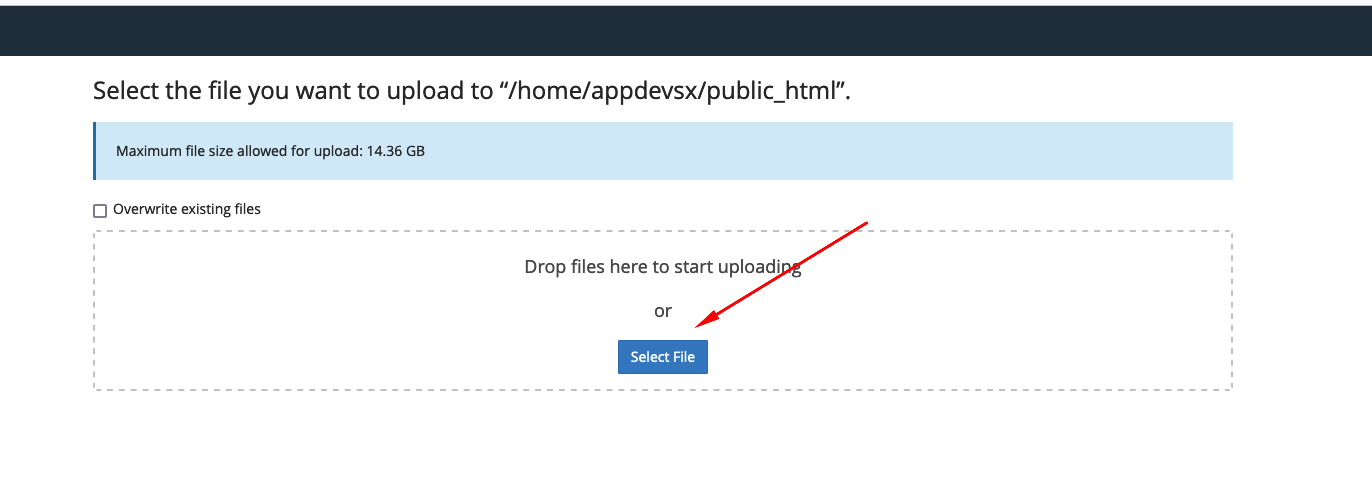
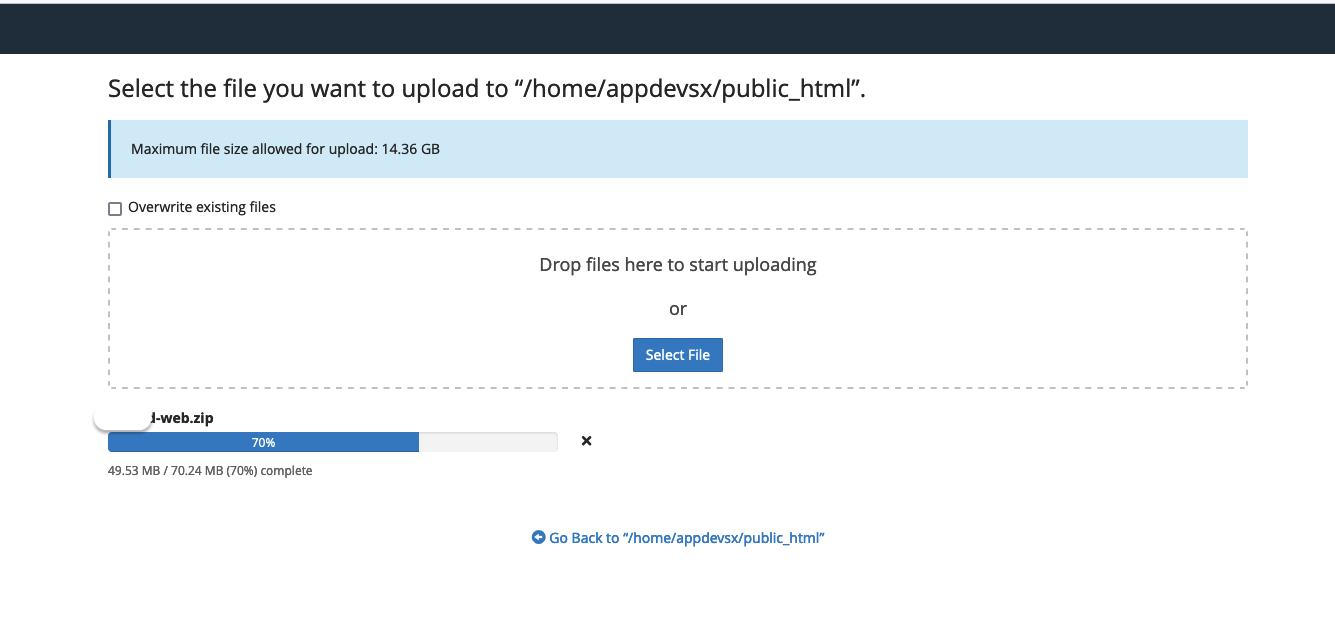
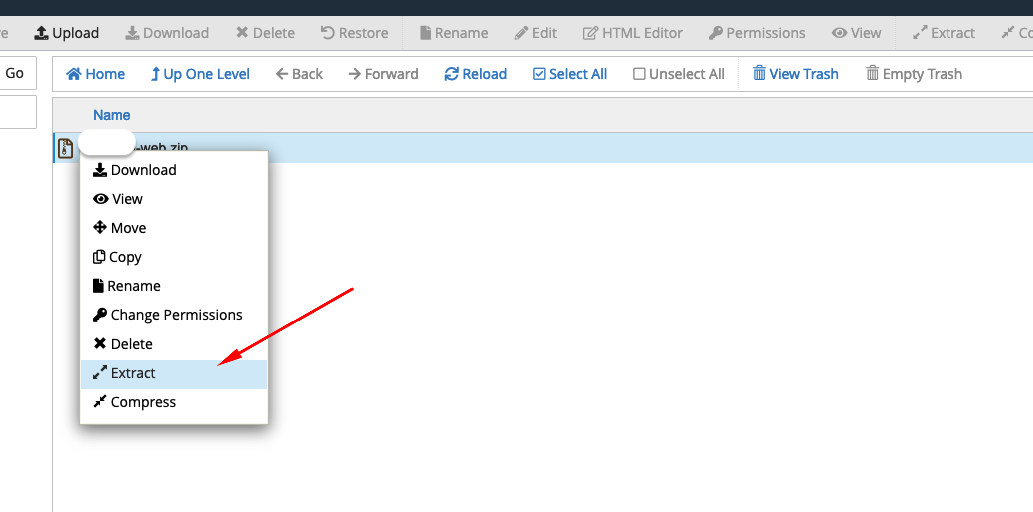
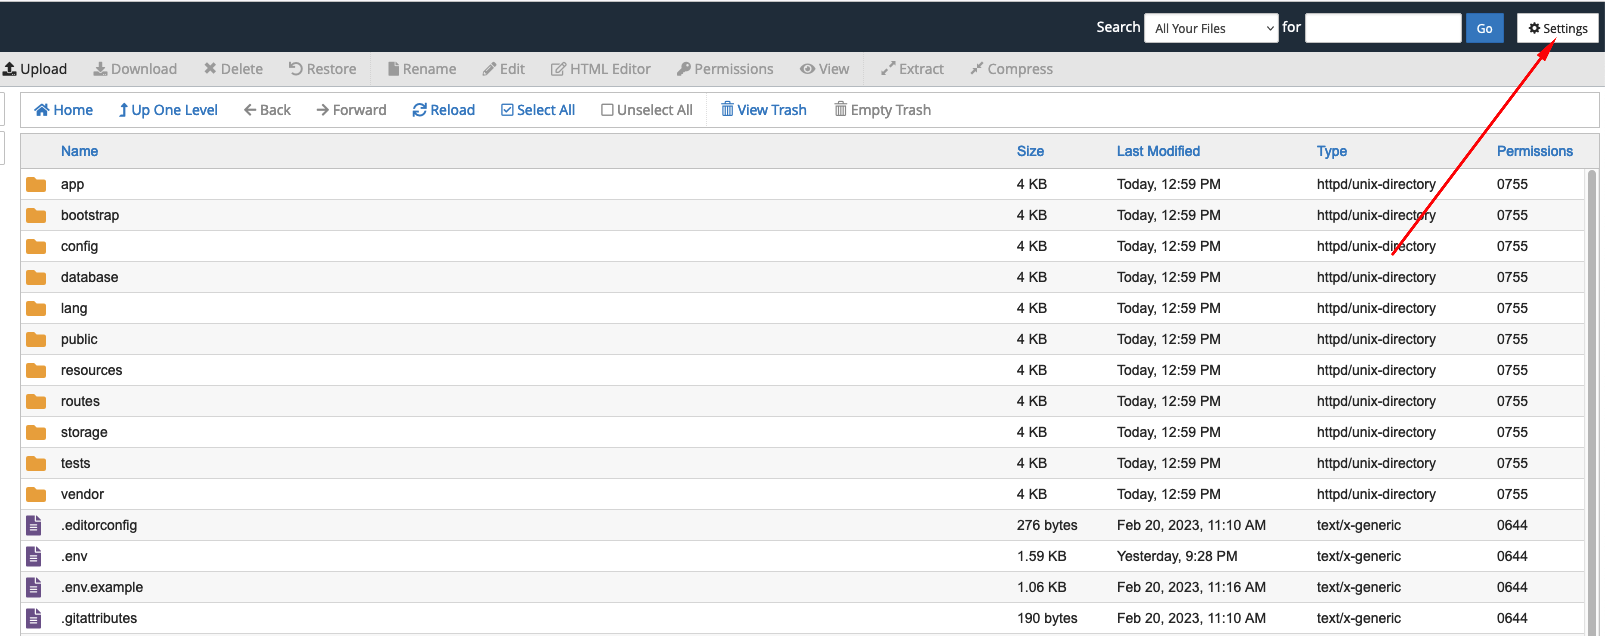
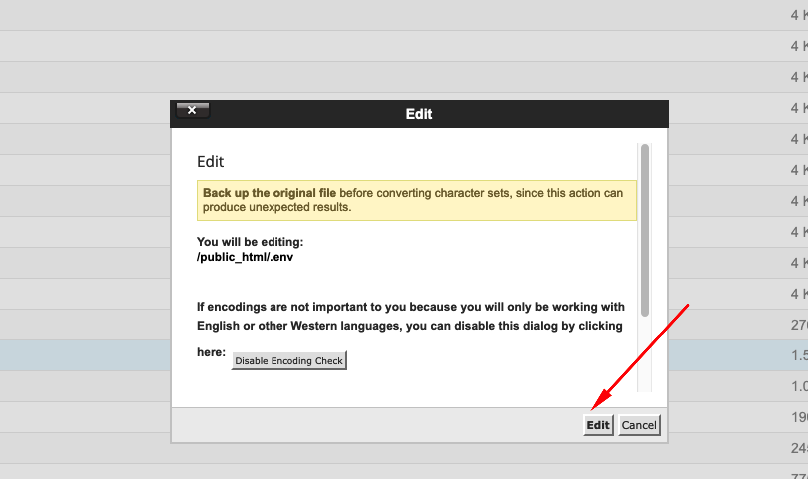
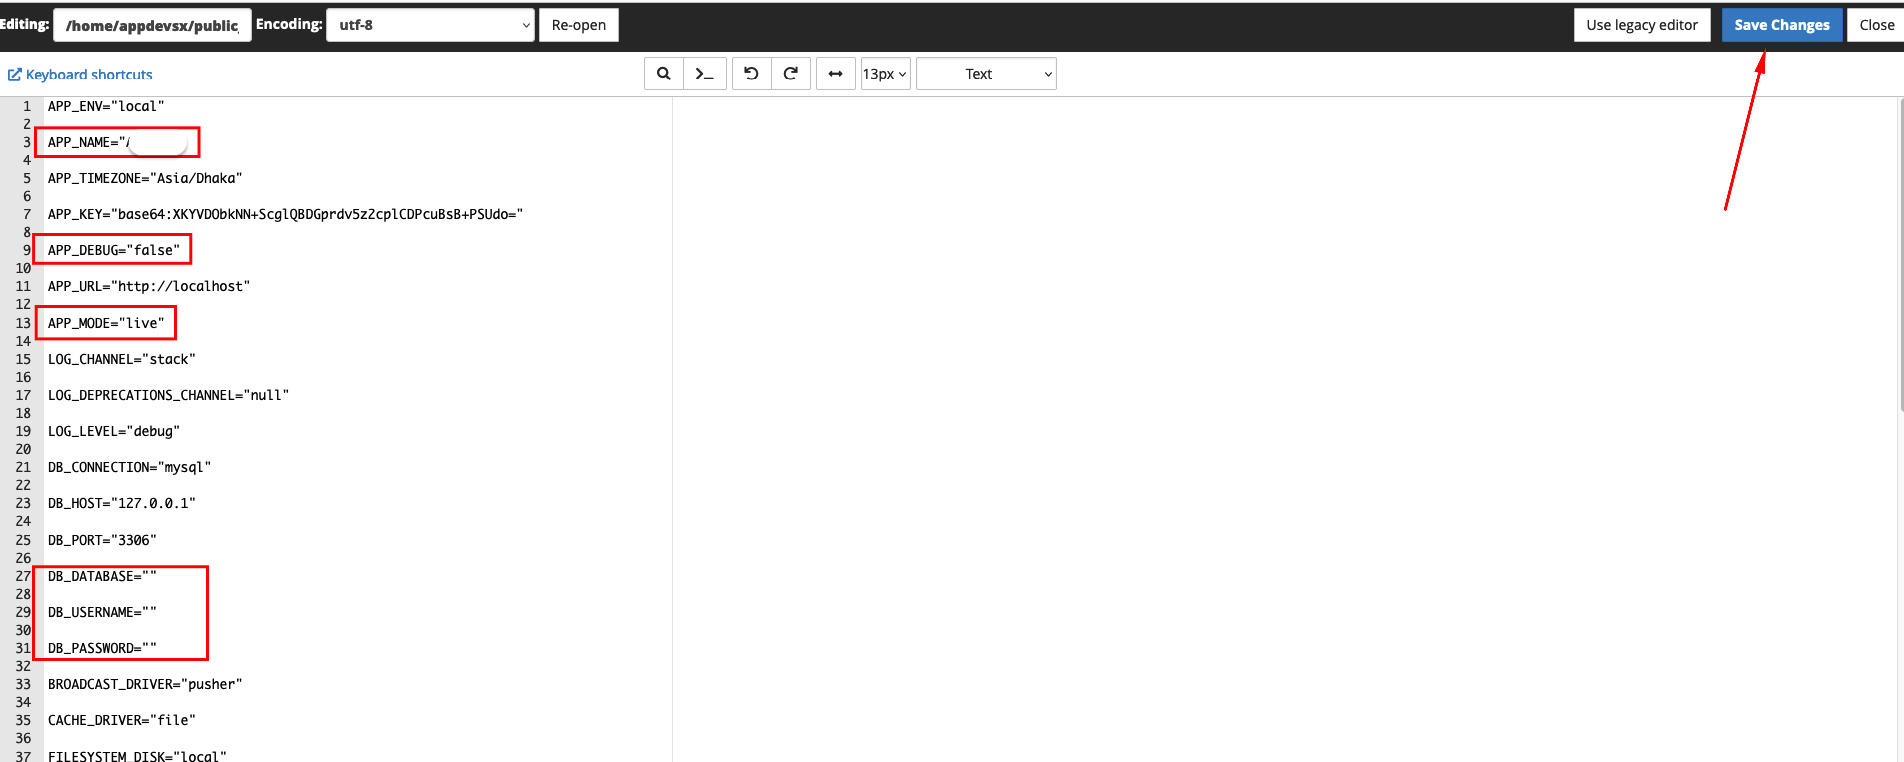
Please login your cPanel account & follow these steps - Go to file manager
- Open
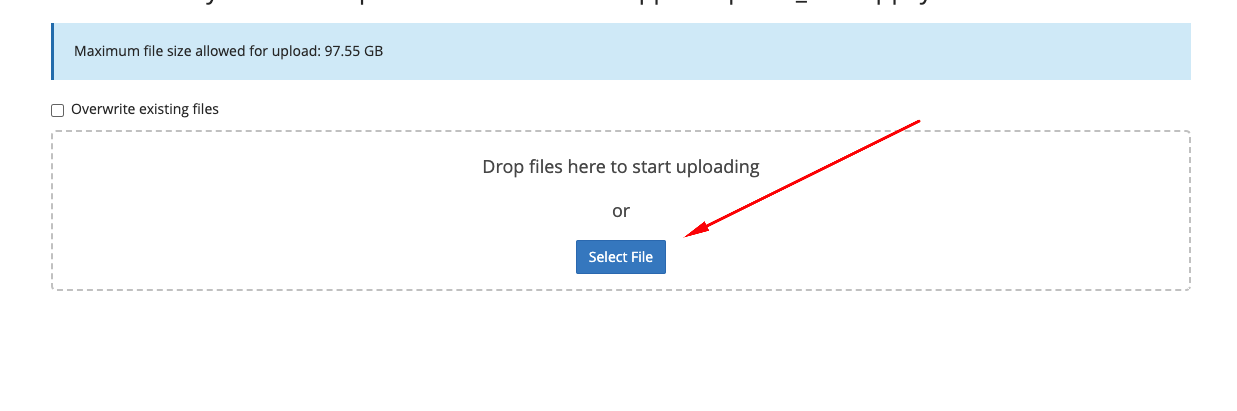
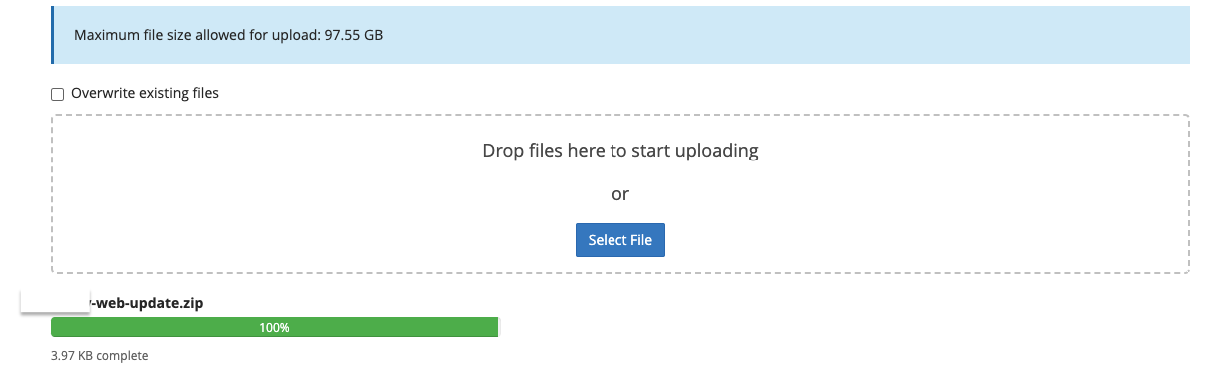
public_htmlfolder & click onUploadbutton - Step 2:
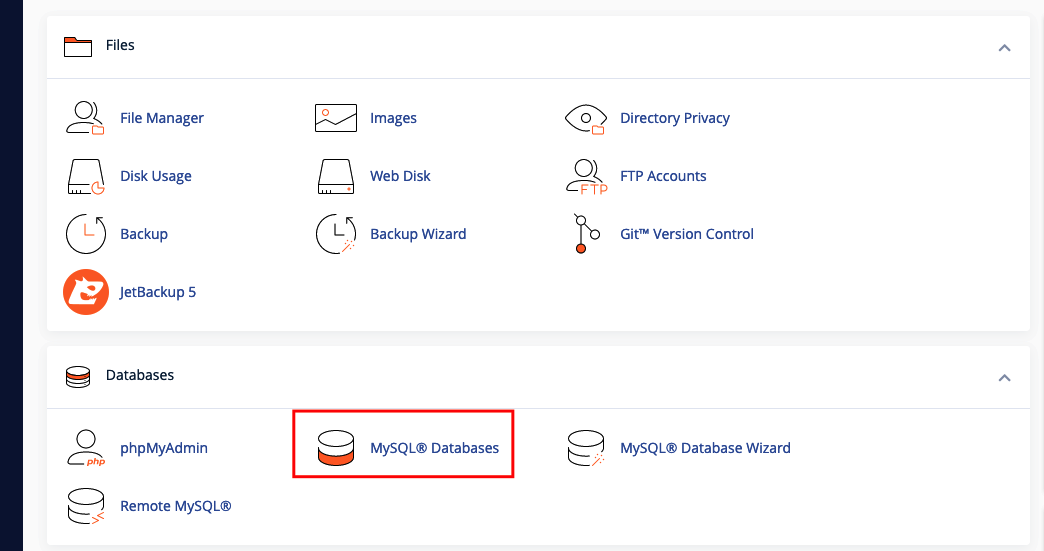
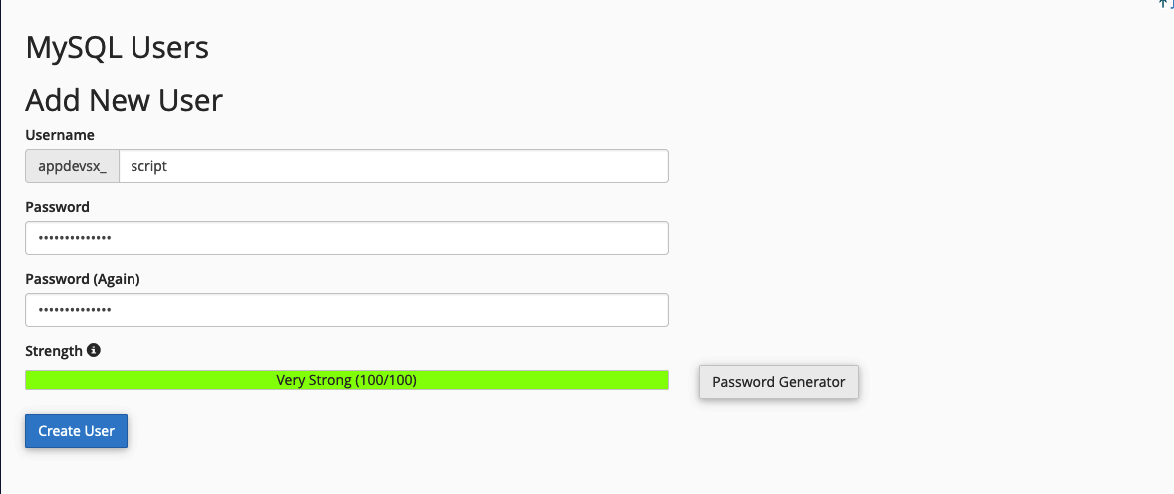
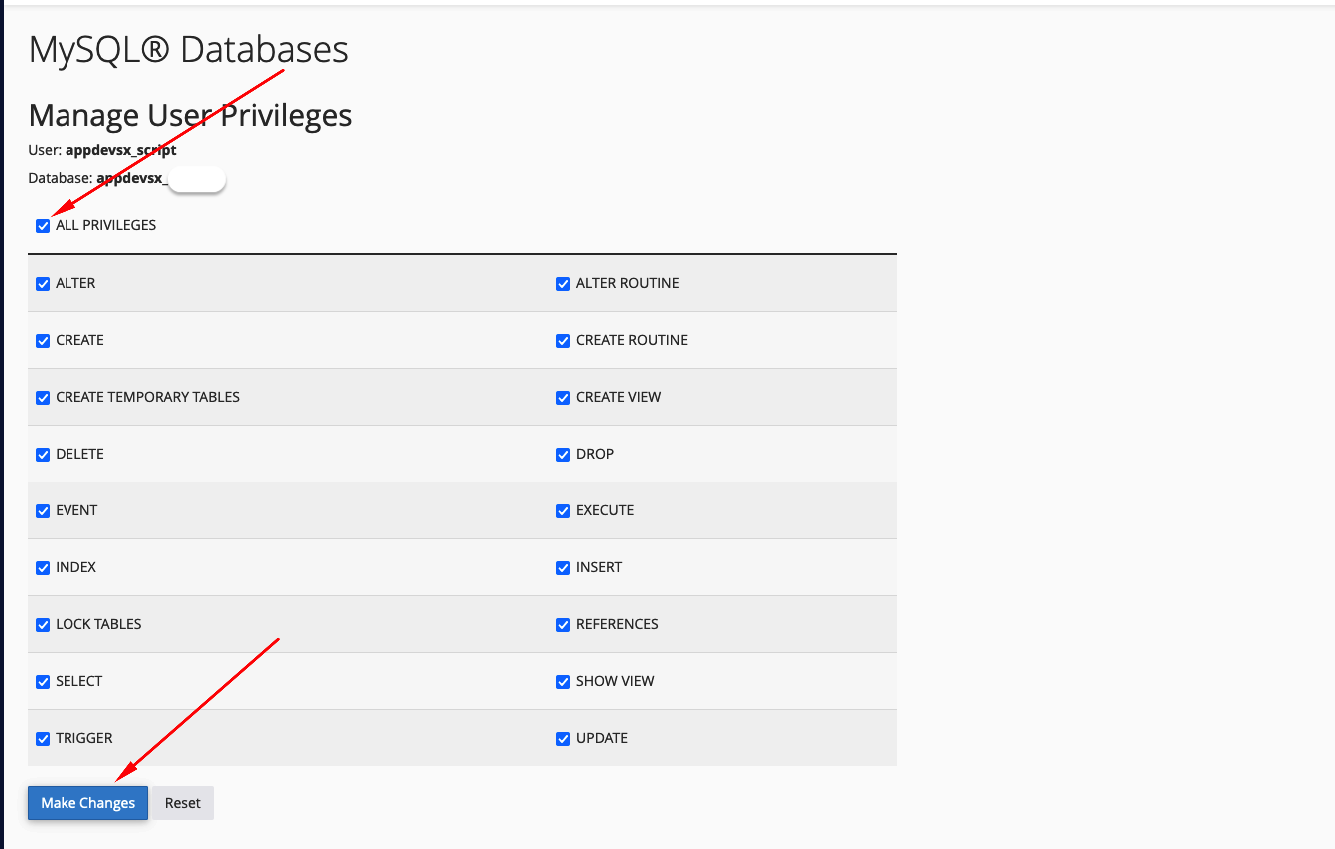
Then, Go to mySQL database - Step 3:
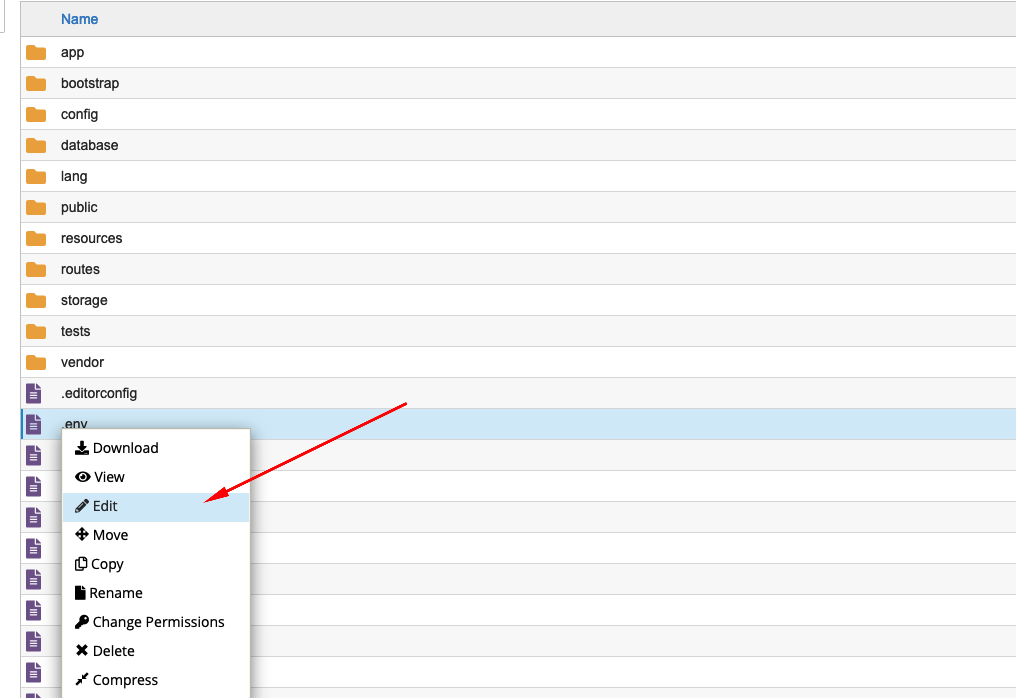
Go back file manager & follow these steps - Step 4:
Now run you domain path, where you uploaded the project. You will installer steps and carefully follow the instructions


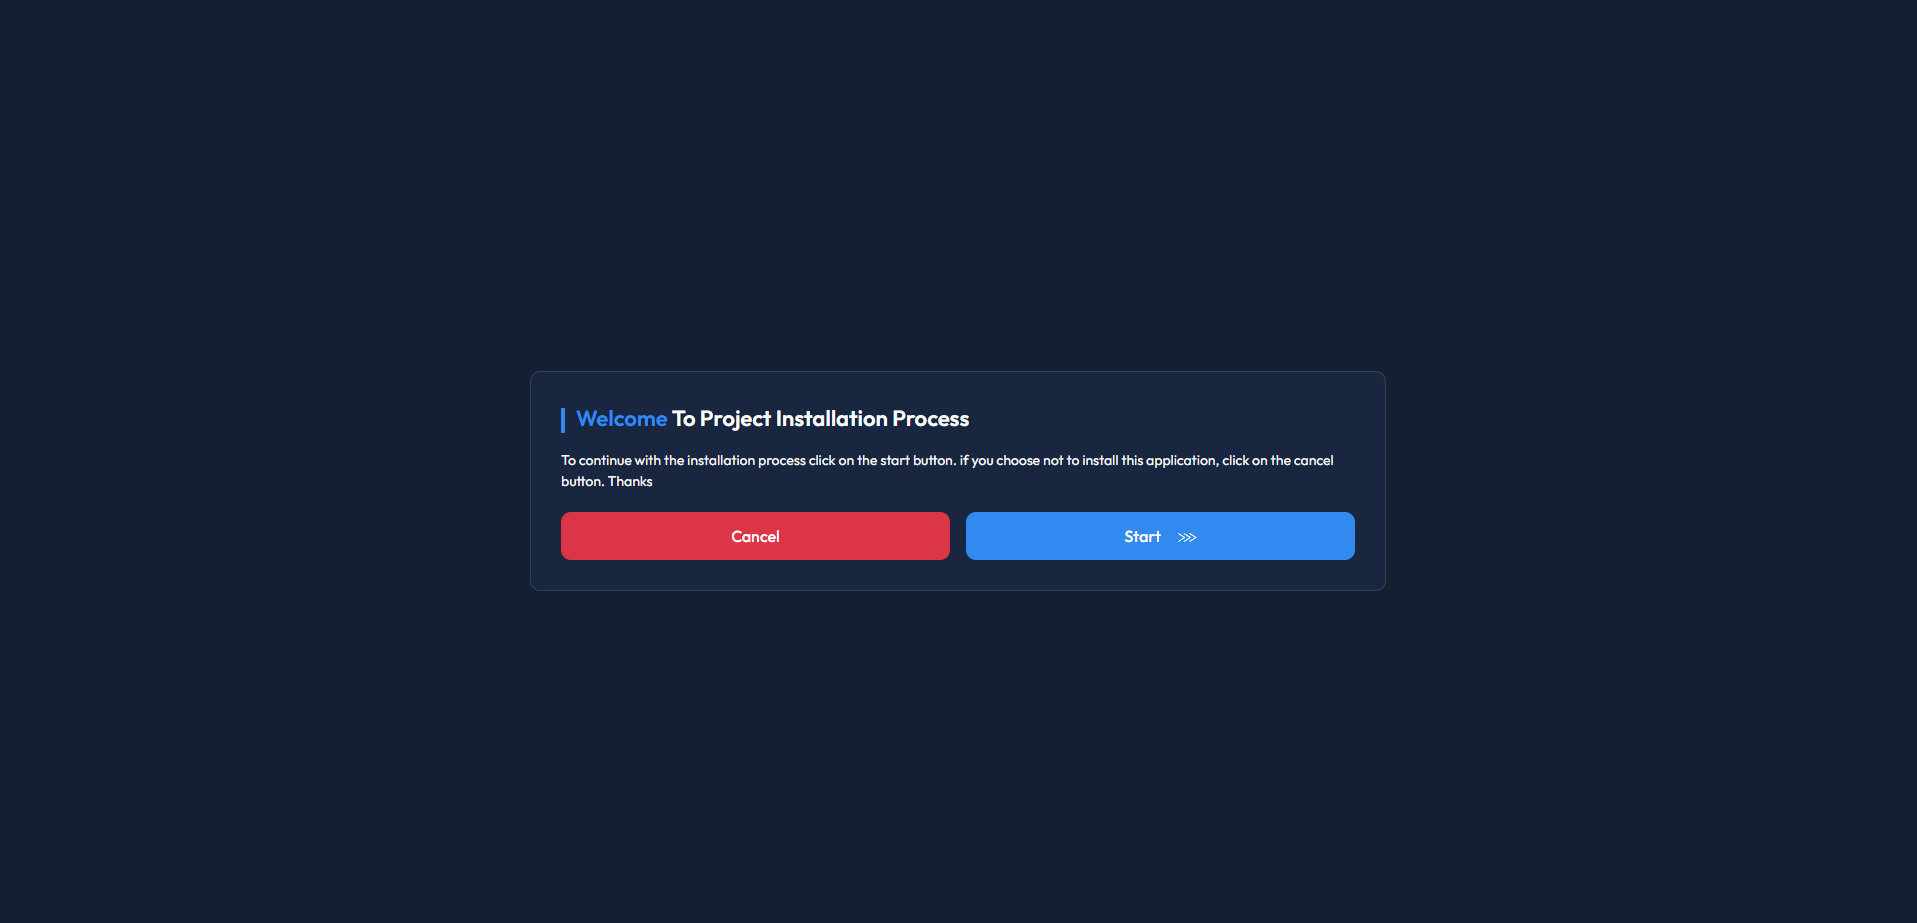
Click the "Start" button and follow all steps, then it will completely install on your server. Final look will like this.
Configuration! you have successfully run the website. Please go to web browser & checkout your domain

Setup Admin Panel
- Admin Profile>Set your own information and login credentials
- Setup Email>Email Method: using SMTP webmail for configuration
- Web Settings>Basic Settings: setup business and basic information
- Web Settings>Image Assets
- Web Settings>Setup SEO
- Setup Curreny>Update with your own currency
- Payment Methods>Add Money>Automatic: put your own payment credentials
Login admin panel and go to dashboard, please changes some basic information for run the site
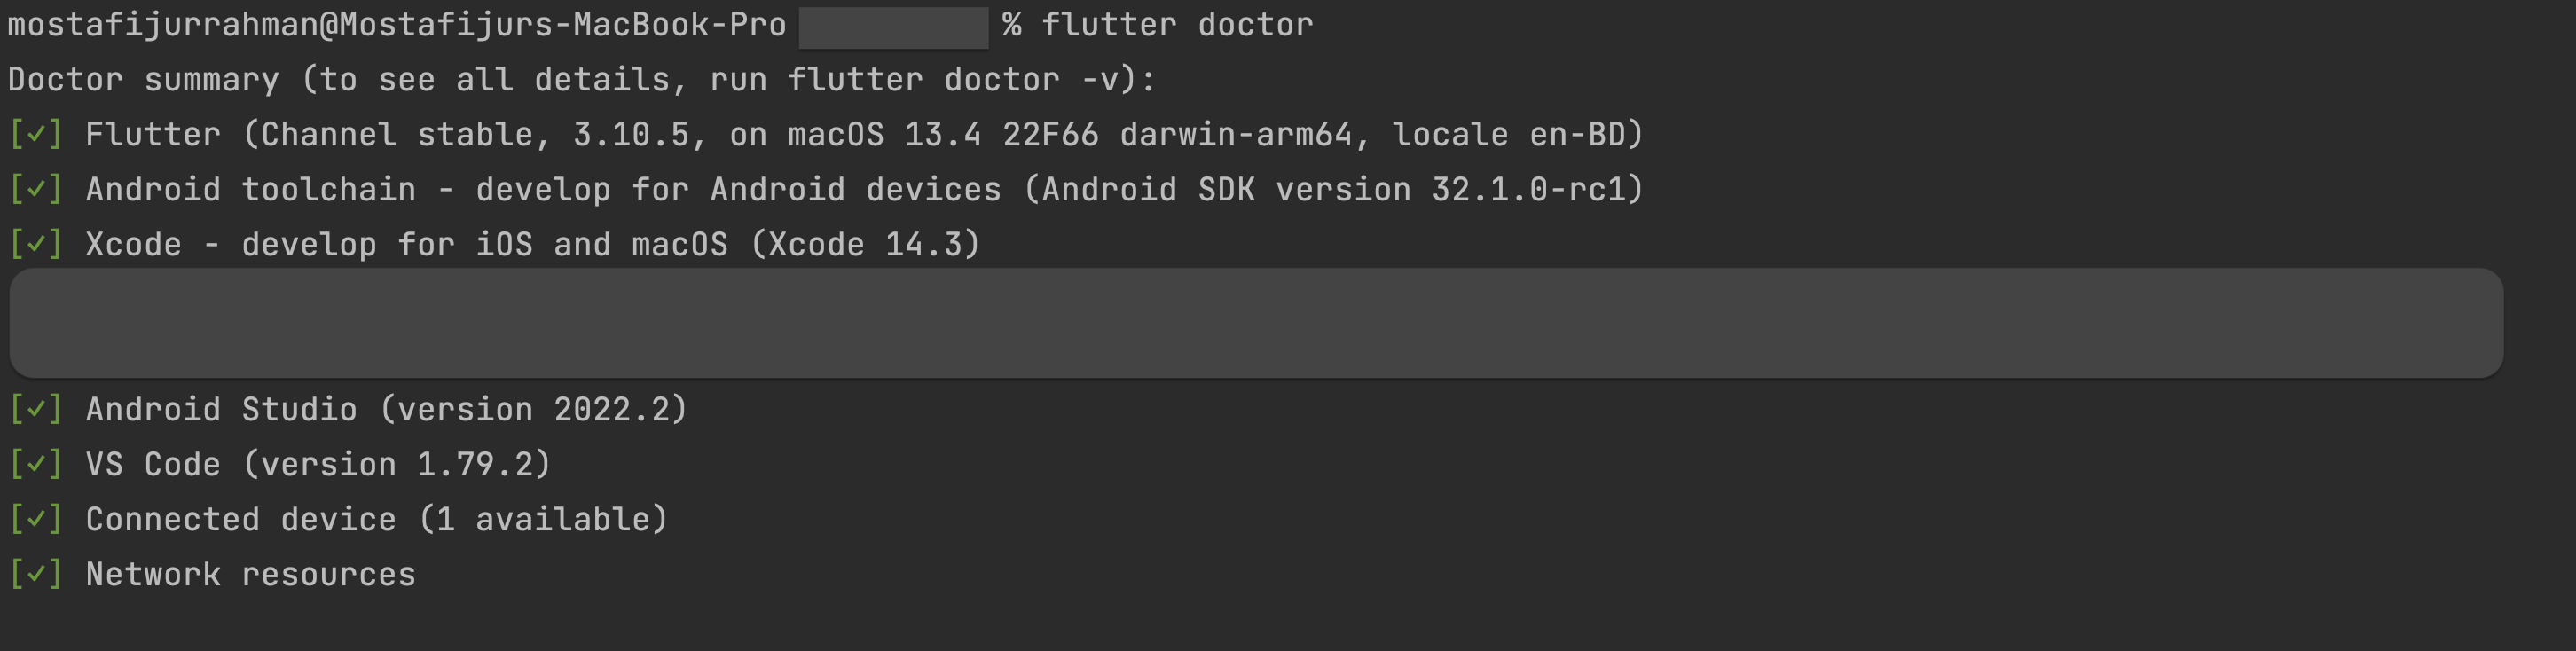
Setup App Environment
- Android Studio/VS Code: To customised this project you should have Flutter and Dart installed and configured effectively on your device Install Flutter Set up your editor Install the Flutter and Dart Plugins.
- Java (JDK): Install java jdk version - 11(LTS) according to your os system.
- Dart (SDK): Install the latest stable version of Dart.
- Flutter (SDK): To configure this project you have to install flutter version - 3.10.5
- Unzip the flies folder and open it. There have source code name as TikTokShop-app, then use your preferred IDE (Android Studio / Visual Code / IntelliJ) to open the project.
flutter pub get
Setup App
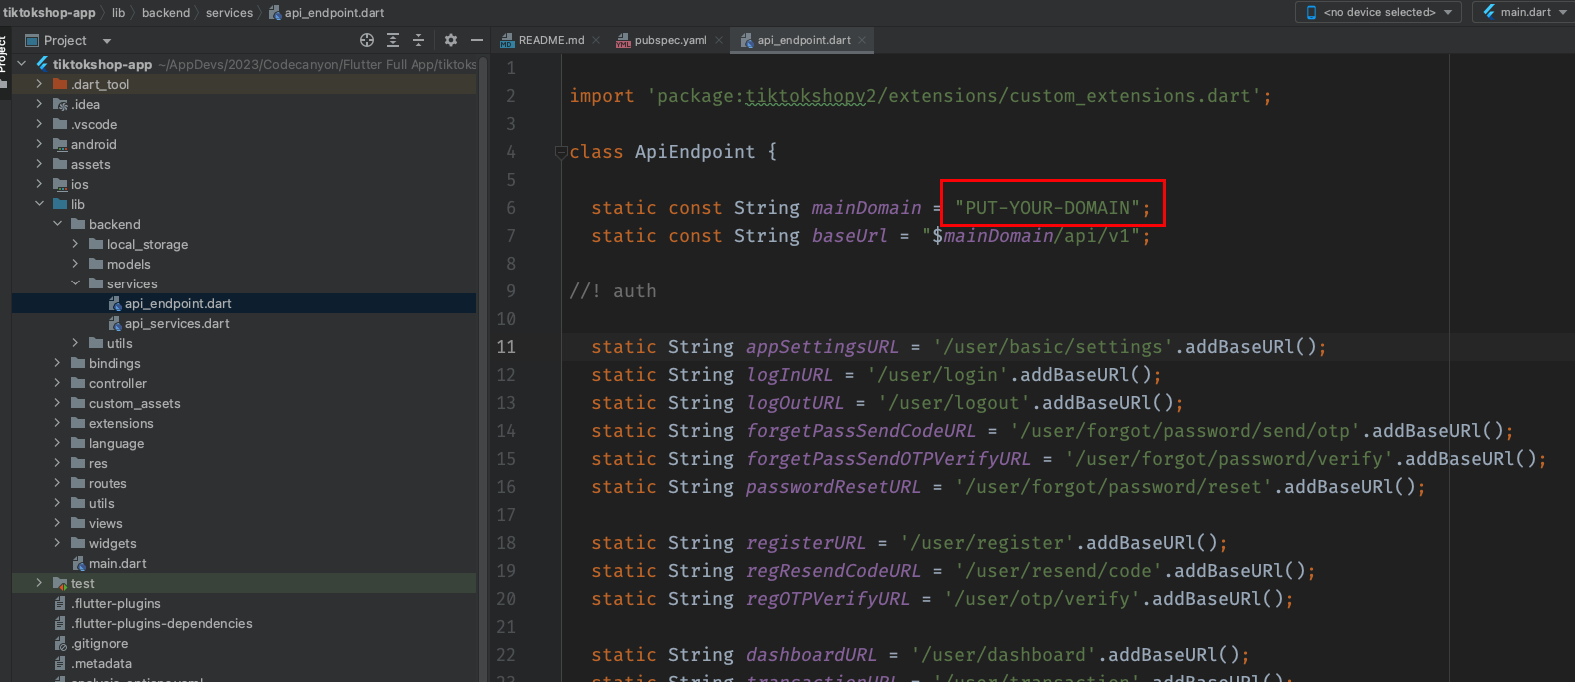
- Set Domain: Go to /lib/backend/services/api_endpoint.dart file and put your own domain.
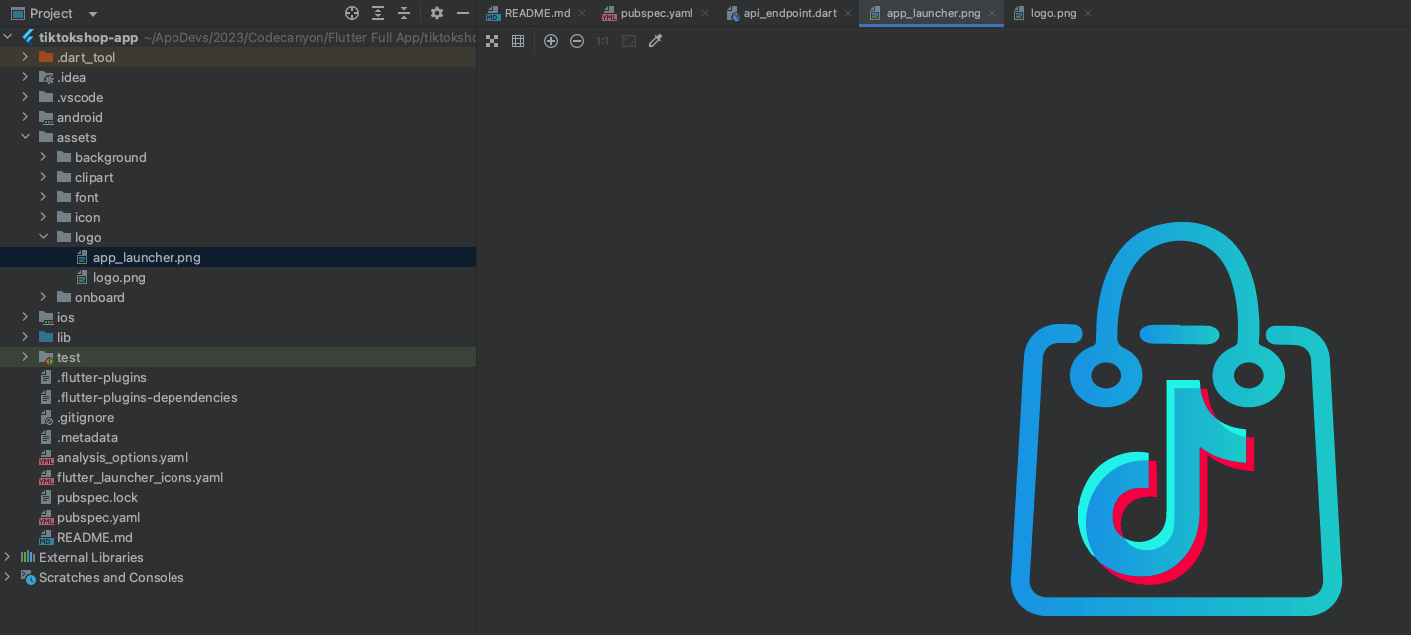
- Logo/Icon Change: Go to /assets/logo/ file and replace all image assets with keep the file name same.
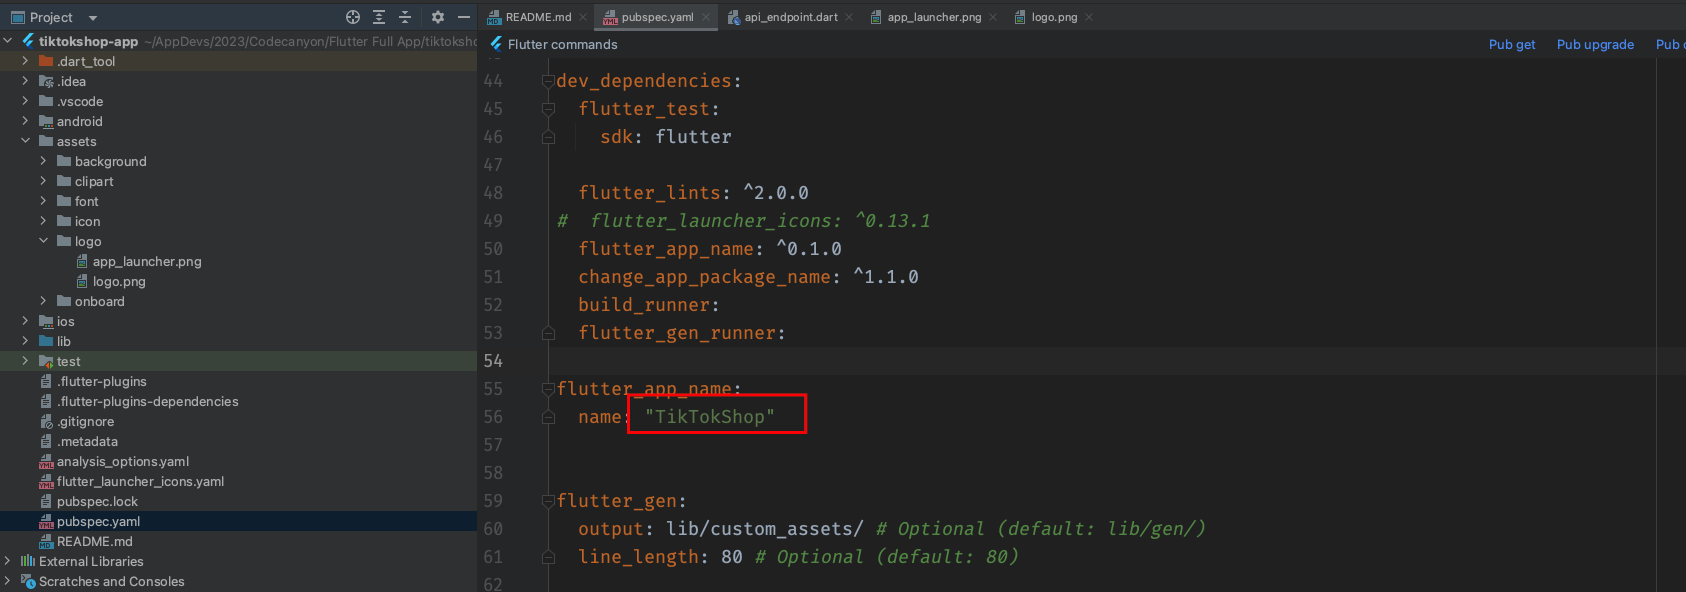
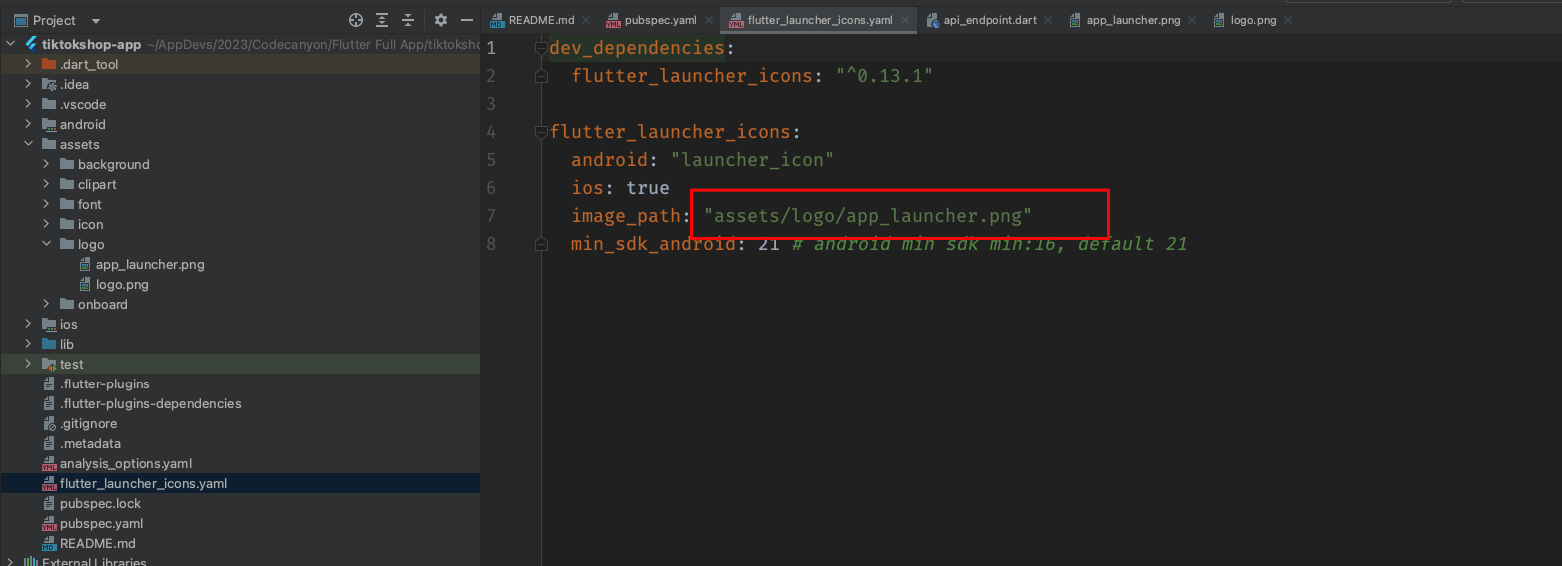
- Package Name and App Laucnher Name-Icon Change: Go to /pubspec.yml/ file and put your luncher icon path and app name.
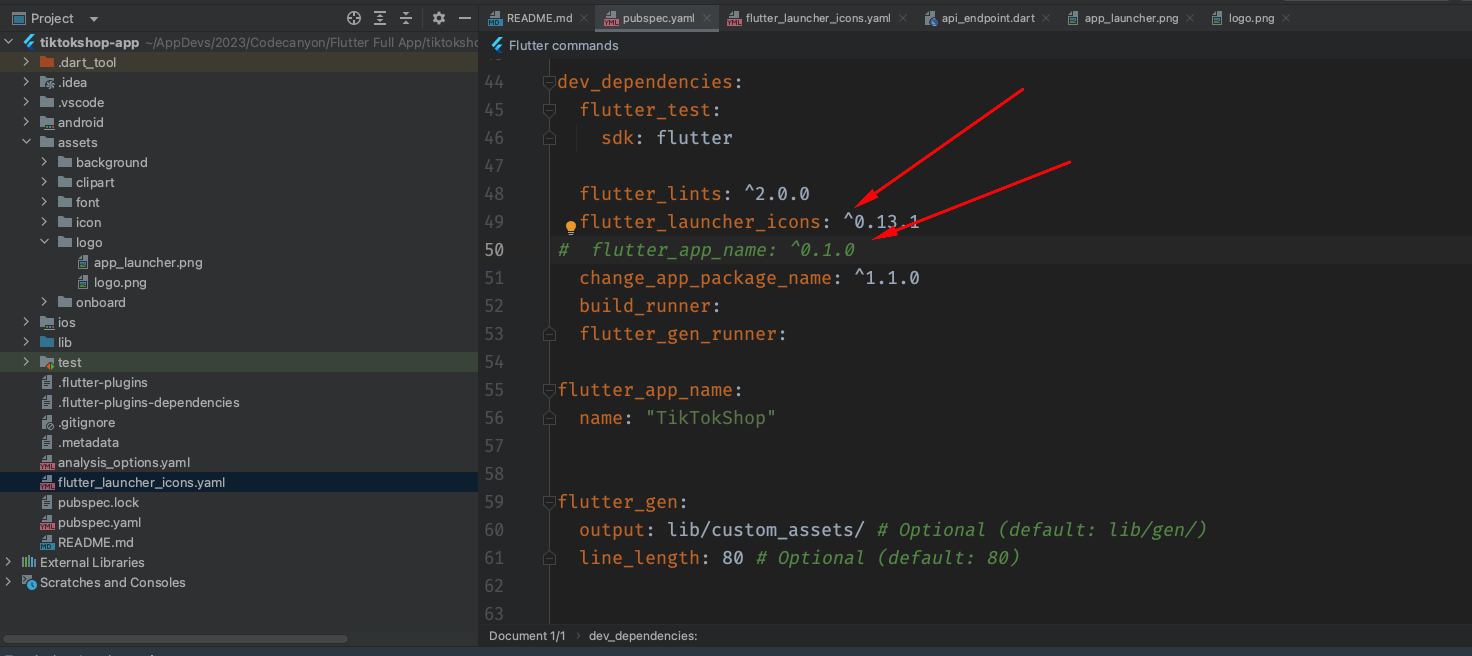
- App Laucnher Icon Change: Go to /pubspec.yml/ and /flutter_launcher_icons.yaml file and put your luncher icon path.
- Please try to use real device for installing app, sometimes it's not run emulator/simulator
 Please run all command:
                                        flutter pub get


                                        flutter pub run flutter_app_name
flutter pub run change_app_package_name:main com.new.package.name
Where com.new.package.name is the new package name that you want for your app. replace it with any name you want.
 Please run all command:
flutter pub get
flutter pub run flutter_launcher_icons
Build & Run:
Run the Android Application:
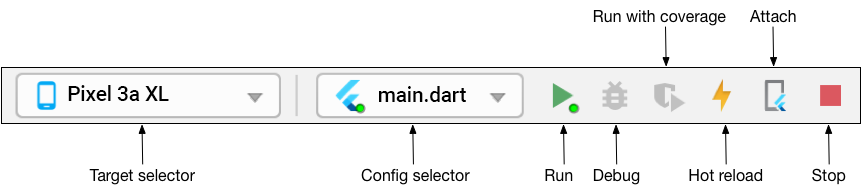
- In the target selector, select an Android device for running the app. If none are listed as available, select Tools> Android > AVD Manager and create one there. For details, see Managing AVDs. Click the run icon in the toolbar, or invoke the menu item Run > Run. Locate the main Android Studio toolbar:
- If you don't use Android Studio or IntelliJ you can use the command line to run your application using the following command:
flutter run
Run the iOS Application:
- The first thing that we require in hand is a test flutter app on our Mac
- Before we start testing our flutter app on the iPhone you need to make sure that our phone trusts us as a developer on that device. To do that follow this path go:
- To test or deploy our flutter app to a physical device we first need to enable physical device deployment in Xcode using Apple ID or an Apple Developer account. And we also need to set up a package manager to manage flutter plugins that are to be used in the project.
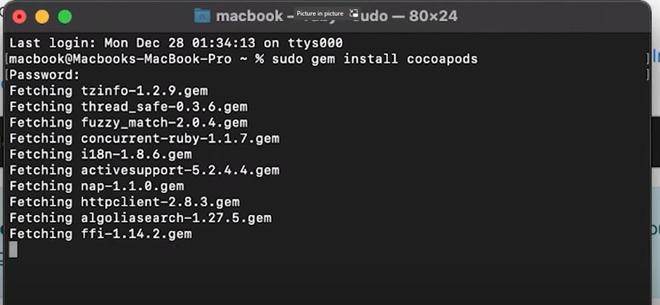
- First, we are going to install a third-party package manager called CocoaPods to manage flutter plugins that our project might depend on. To install and set up cocoapod the below command needs to be executed successfully in the terminal.
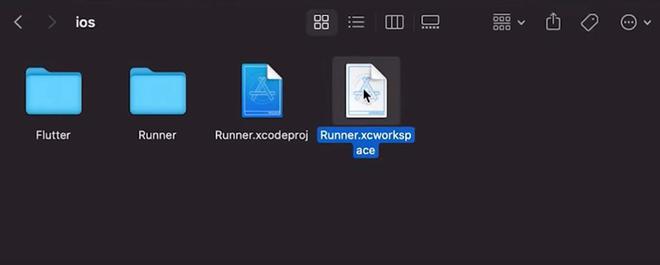
- After we are done with the cocoapod installation we will proceed to locate the Runner.xcworkspace file inside the ios folder in our project directory. Then we need to open this file on the Xcode with a double click. OR write command
- When it’s done loading we need to make sure we are on the Runner file which is listed first on the left menu bar.
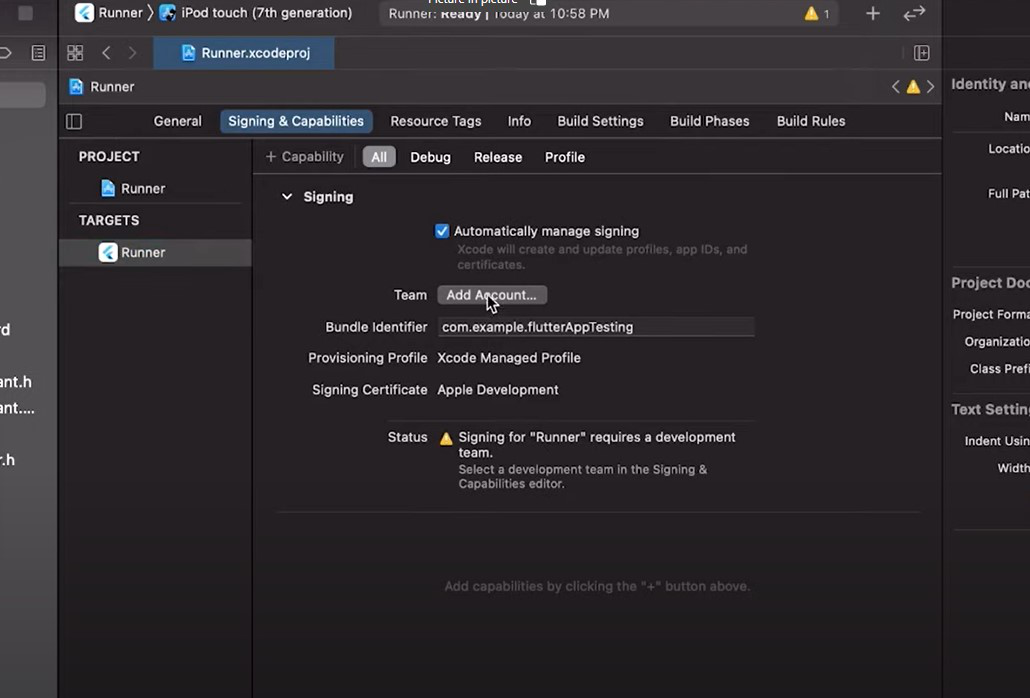
- After that, we need to be inside the Signing & Capabilities page. In this page we will click on the button which says ‘Add an Account’.
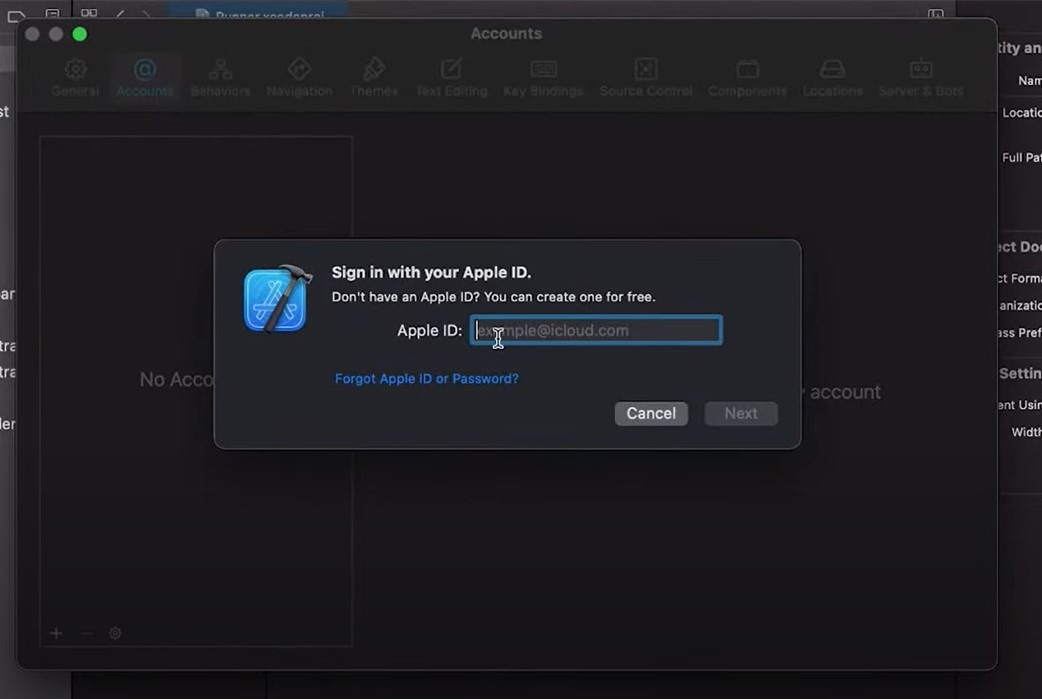
- And add your Apple ID, put your password and select your account.
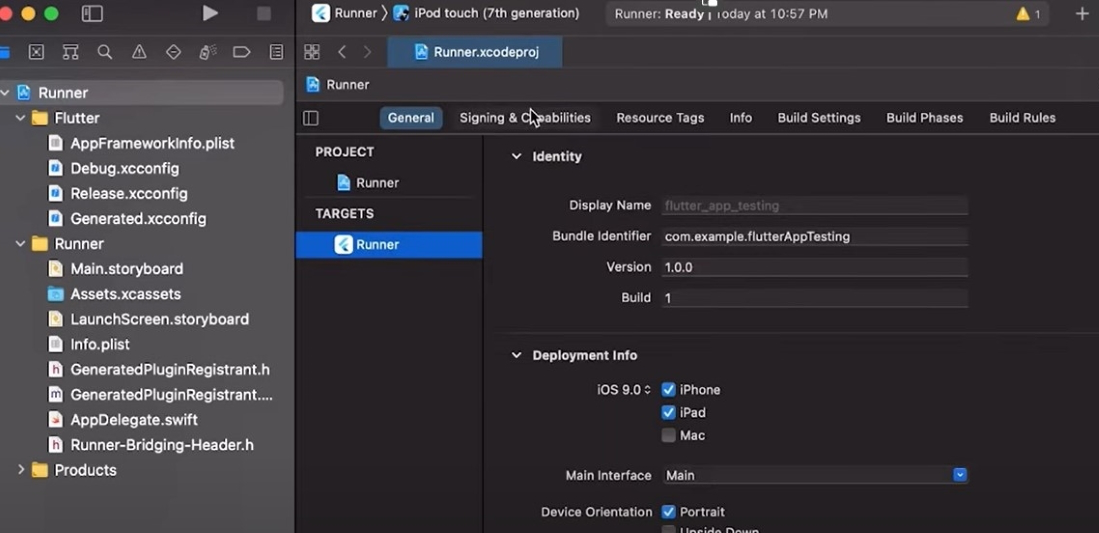
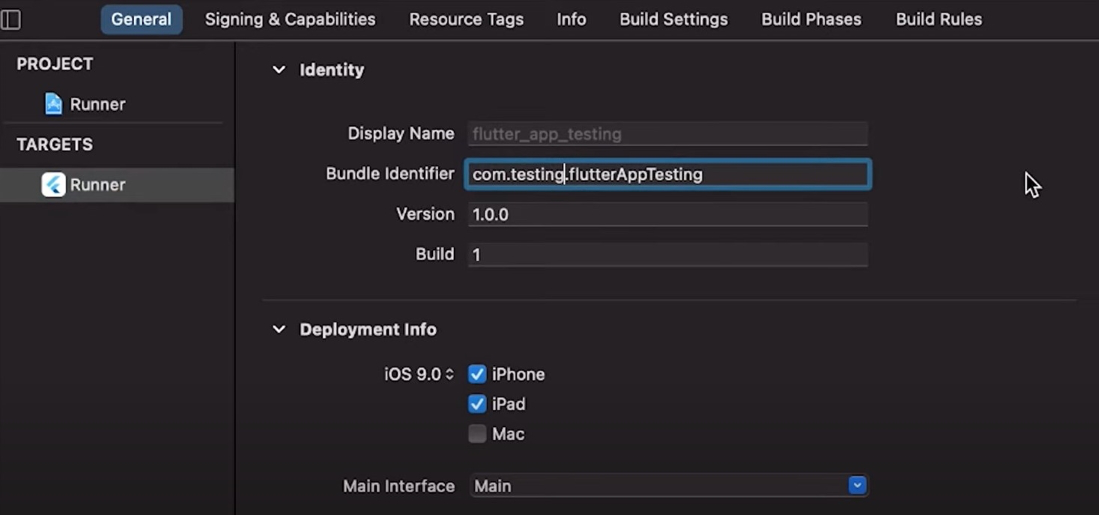
- Now, go back to the General tab and change the Bundle Identifier to something unique. (In place of “example” put something else).
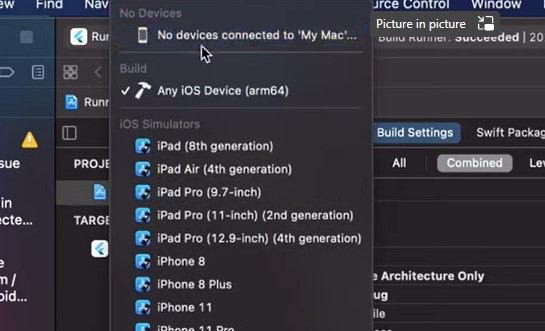
- So, if you haven’t already connected your iPhone you will see “No device” in the search bar shown below.
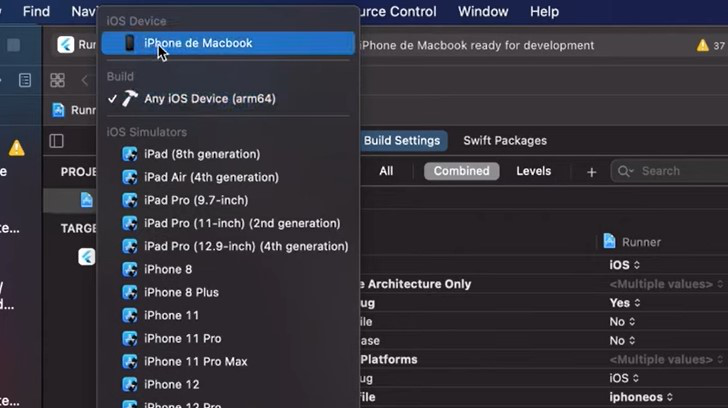
- Go ahead and connect your phone with the PC and when it’s done you will see a phone icon in place of “No device”. Select your phone which will take a few seconds to load.
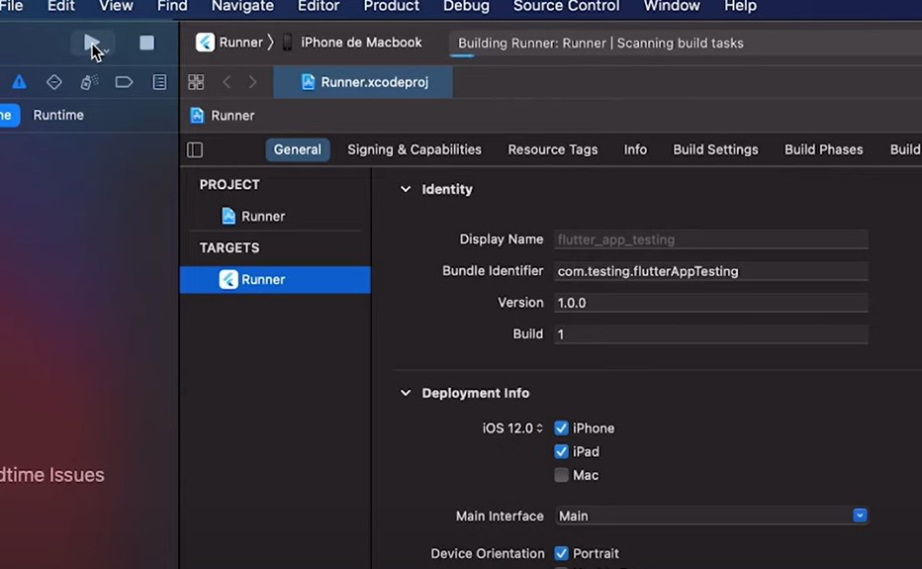
- And once that is done you need to press the play button on the left menu bar, which will start building the app on the iPhone
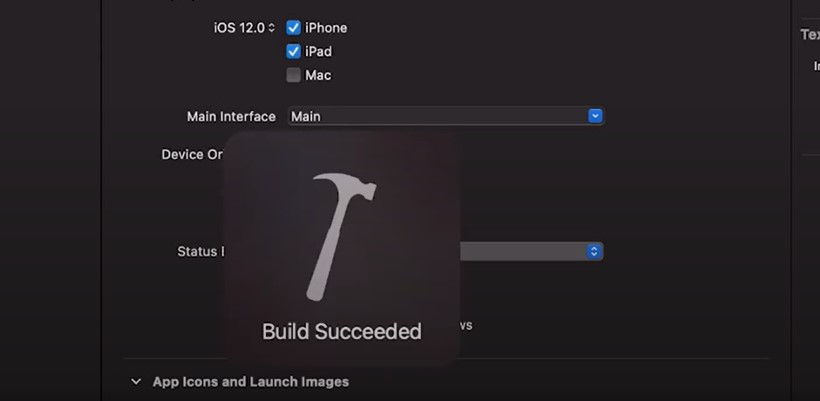
- This process will take some time and once it’s done you will see a message appear that says the build process was completed successfully.
Settings > General > Device Management or Profile > (Tap On) Trust “Your Developer Name”
$ sudo gem install cocoapods
$ open ios/Runner.xcworkspace
Install And Release Android App:
Here is your section structure.
- After you make all your changes and customizations save all your project, Open the console, navigate to your project folder and execute the following command to build your app:
- If you are deploying the app to the Play Store, it's recommended to use app bundles or split the APK to reduce the APK size.
flutter build apk --release
Build and Install App:
- To generate an app bundle, run:
- To split the APKs per ABI, run:
- If you want to upload your application on Google Play you must sign it before uploading, generate a signing key by running the following command:
- Reference the keystore from the app: Create a file named appdir/android/key.properties that contains a reference to your keystore:
- Go to android/app/build.gradle
- signingConfigs {
release {
keyAlias keystoreProperties['keyAlias']
keyPassword keystoreProperties['keyPassword']
storeFile file(keystoreProperties['storeFile'])
storePassword keystoreProperties['storePassword']
}
} - buildTypes {
release {
signingConfig signingConfigs.release
}
} - Learn More: Build and release an Android app
flutter build appbundle --target-platform android-arm,android-arm64,android-x64
Learn more on https://developer.android.com/guide/app-bundle
flutter build apk --target-platform android-arm,android-arm64,android-x64 --split-per-abi
Learn more on https://developer.android.com/studio/build/configure-apk-splits#confi
keytool -genkey -v -keystore android/app/key.jks -keyalg RSA -keysize 2048 -validity 10000 -alias key
                                        storePassword=password from previous step

                                        keyPassword=password from previous step

                                        keyAlias=key

                                        storeFile=location of the key store file, e.g. /Users/user name/key.jks
                                        def keystorePropertiesFile = rootProject.file("key.properties")
def keystoreProperties = new Properties()
keystoreProperties.load(new FileInputStream(keystorePropertiesFile))
Install And Release iOS App:
Before you can build and release your app on the App Store, you need to set up a place for it using App Store Connect. But first, you need to register a unique bundle ID for your app. This can be done by logging into your Apple Developer account and following these steps:
- Login to AppStore Conscole Account Click Here
- Open the App IDs page.
- Click + to create a new Bundle ID.
- Fill out the needed information: App Name, and Explicit App ID.
- If your app needs specific services, select them and click Continue.
- Review the details and click Register to finish.
- Then go to account dashboard Select My Apps.
- Click + then select New App.
- Fill in your app details and make sure iOS is selected, then click Create.
- From the sidebar, select App Information.
- In the General Information section, select the Bundle ID that you registered above. You’ve set everything up from Apple’s side, and next you’ll adjust your Xcode project’s settings to prepare your app for release. Go ahead and fire up Xcode.
- Open Runner.xcworkspace that is inside your app’s iOS folder.
- From the Xcode project navigator, select the Runner project.
- Go to the General tab.
- In the Identity section, fill out the information and make sure the Bundle Identifier is the one registered on App Store Connect.
- In the Signing section, make sure Automatically manage signing is checked and select your team
- Fill out the rest of the information as needed.
- Next, you’ll update your app’s icon. This can be done by selecting Assets.xcassets in the Runner folder from Xcode’s project navigator. At this point, all the settings have been updated for release and there is a placeholder ready on App Store Connect, which means you can build and release.
- From the command line, run flutter build ios
- Then go back to Xcode and reopen Runner.xcworkspace
- Select Product -> Scheme -> Runner
- Select Product -> Destination -> Generic iOS Device.
- Select Product -> Archive to produce a build archive.
- From the Xcode Organizer window, select your iOS app from the sidebar, then select the build archive you just produced.
- Click the Validate… button to build.
- Once the archive is successfully validated, click Upload to App Store Back on App Store Connect, check the status of your build from the Activities tab. Once it’s ready to release:
- Go to Pricing and Availability and fill out the required information.
- From the sidebar, select the status.
- Select Prepare for Submission and complete all required fields.
- Click Submit for Review
- Learn More: Build and release an iOS app That’s it! Your app will now be uploaded to the App Store. Apple will review your app before releasing and keep you updated on the status of your app.
Version Update for Only Old Buyer
update-on-server:
After re-download the code from codecayon upload the and XRemit Pro-web-update files in your server following your expected directory and extract the zip file.
Website & Admin Panel Installation:
- Step 1:
Please login your cPanel account & follow these steps - Go to file manager
- Open
public_htmlfolder & click onUploadbutton - Please run these command after updating file on terminal:
Final Step
v1.0.0 to v2.0.0
composer update && composer dumpautoload && php artisan migrate
php artisan db:seed --class=Database\\Seeders\\Admin\\Update\\PaymentGatewaySeeder
php artisan db:seed --class=Database\\Seeders\\Update\\LanguageSeeder
php artisan db:seed --class=Database\\Seeders\\Admin\\Update\\SiteSectionsSeeder
php artisan db:seed --class=Database\\Seeders\\Admin\\Update\\UsefullLinkSeeder
php artisan db:seed --class=Database\\Seeders\\Admin\\Update\\BasicSettingsSeeder
php artisan passport:install --force
Support
Once again, thank you so much for purchasing this app. As I said at the beginning, I'd be glad to help you if you have any questions relating to this app. Just let us know, We will assist you. Contact us at support center.
Available Technical Team Here: Submit Ticket with Purchase Code
[N.B. For this project, you have to follow our documentation where we noted the requirements. if you face any kind of problems or fail to configure this project, then we are not responsible for this situation. after that, if you want to configure this project by us then you will have to pay for that installation charge. Thank You.]
© Copyright AppDevs, 2021-2023. All Rights Reserved.